BF2HMT Tutorial
This tutorial will guide you through the process of downloading, preparing, and importing real-world terrain data into your BF2 level.
Please note: Adobe Photoshop (or another high-quality raster image editor) is needed to complete this tutorial. In the future, the necessary features will be included in BF2HMT itself, making Photoshop unnecessary.
You'll want to start by creating a new map in BF2Editor (check out some general mapping tutorials if you need help with this). Remember what you name it, and what size you choose for the terrain (256, 512, or 1024). Exit BF2Editor.
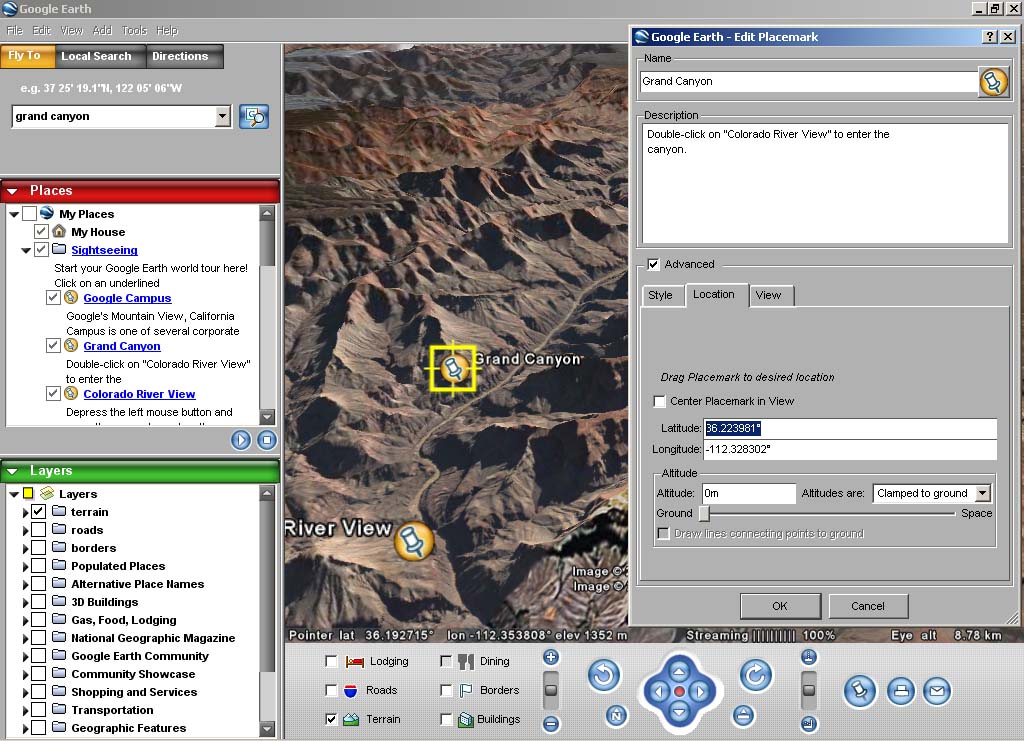
Now, if you haven't tried it already, it's time to introduce you to your new best-friend: Google Earth. You can download a copy for free from: http://earth.google.com/. This tool is perfect for scouting out locations, and visualizing what a completed level might look like. Take some time to play around with it, and choose a location for your level (preferably in the continental US).
Next, go to: http://seamless.usgs.gov/. Click "View and Download United States Data". You can try internationally too of course, but they're less likely to have high-resolution data outside the US.
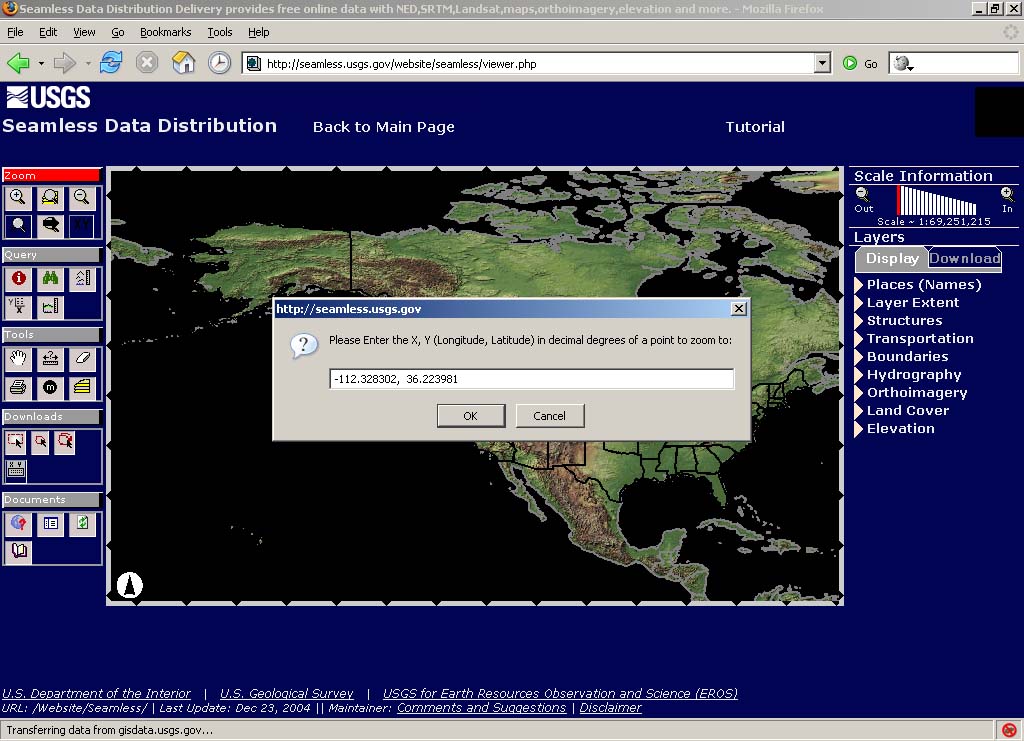
Click the "Zoom > XY" button, on the right-hand menu, and enter the coordinates you'd like to see. Alternatively you can browse the map, and find the location yourself.
The "Scale Information" on the right-hand menu shows the current scale, and lets you adjust it. From trial and error, I'd recommend zooming to about 1:800,000 scale if you intend on using NED 1, or 1:200,000 scale if you intend on using NED 1/3 (these are explained later - for now just choose one). You'll need to experiment though to achieve the best results. How much area you want to select is somewhat dependent on your map-size (256, 512, or 1024). In the end, this whole thing is really more Art than Science, so don't be too concerned with making your map "to scale" or anything like that. Just experiment, and do what looks best.
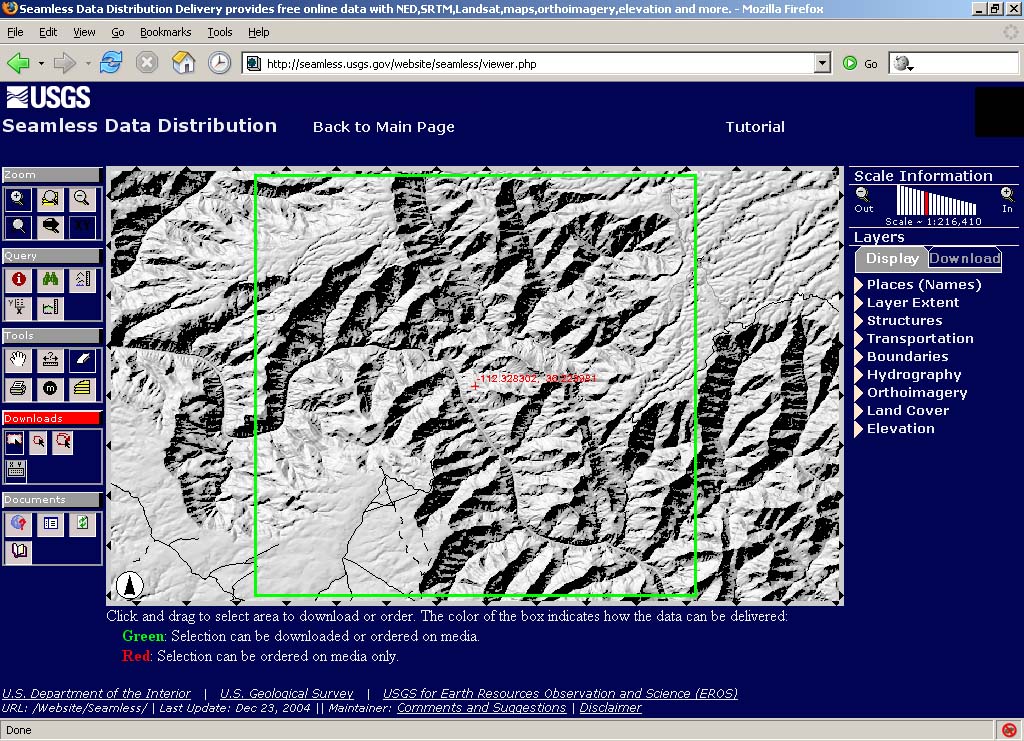
Next, you need to specify what data you actually want. Click the "Define download area" button under "Downloads" on the left-hand menu, and draw a box by dragging your cursor across the map. Try to make this box as close to a square as you can (it doesn't need to be perfect). As you draw it, try to visualize this box divided into thirds, both vertically and horizontally. The middle square will be the primary map (where all the action is), and the surrounding squares will be secondary maps (off-limits scenery).

A "Request Summary Page" will popup, with a download button. But, don't download just yet! We need to change the data-type first. Click the "Modify Data Request" link near the top of the popup window. Here's where you need to choose a dataset: NED 1 (30m resolution), NED 1/3 (10m resolution), or even 1/9 (3m resolution) if it's available. These are essentially just different resolutions you can get, each one providing more data per sq. km than the last. So, if you're zoomed way in, you'll want to select one with lots of resolution (NED 1/9), whereas if you're zoomed all the way out, you'll want to select one with low resolution (NED 1). Set the data format to "BIL", and click "Save changes" at the bottom. You may find that 1/3 and 1/9 datasets are unavailable for your selected area (they don't have total coverage yet).
Back at the download page, you'll want to check the size of the file you're about to get. About 35MB is perfect. If it's much over 50MB you've probably selected too much data. If you have too much, select a dataset with a lower resolution, or select a smaller area on the map. When you're ready, click download. You may have to wait for a minute if the servers are busy.
What you'll get is a .zip file containing a bunch of strange-looking files. I couldn't guess what they're all for... The two we're interested in though are the .bil file, and the .hdr file. Extract them both to a working folder for your map project.
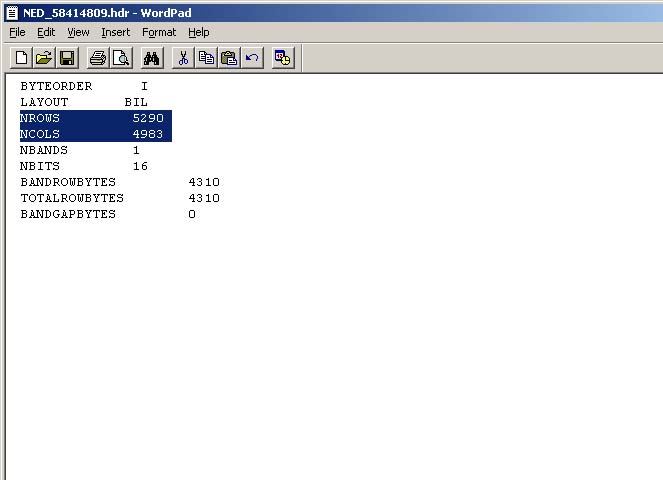
Change the extension of the .bil file to .raw, and open it in Photoshop. Photoshop will display a dialog-box asking for the format of the image (unlike most image formats, .raw files don't store these settings themselves). Thankfully, the .hdr file you unzipped contains the width and height of the image. Open it in wordpad, and look for the numbers beside "NROWS" and "NCOLS".

Enter the number after "NROWS" as height, and the number after "NCOLS" as width. Don't get them backwards! Also, set Count: 1, Depth: 16-bits, Byte-order: IBM PC, and Header: 0 bytes. Click OK.
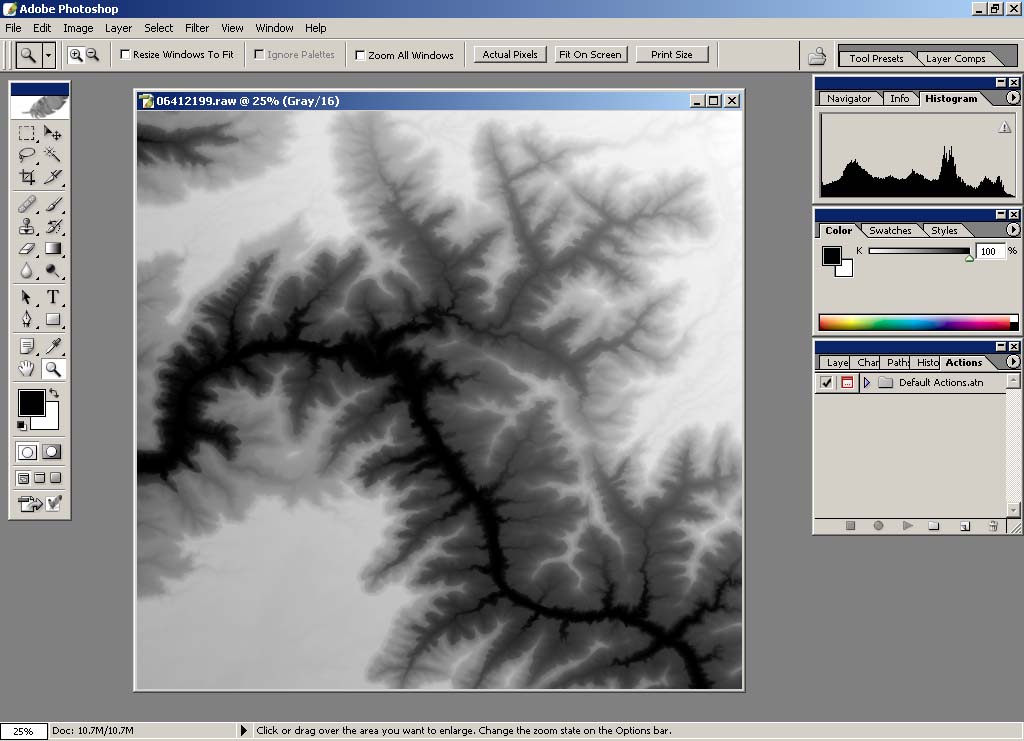
You'll see a disappointing black square. To fix this, press [Alt]+[Shift]+[Ctrl]+[L] which runs auto-contrast. You should now see your terrain. If instead you see a strange pattern of garbled pixels, double check that you didn't get the width and height values reversed, and that you entered everything correctly etc. etc.
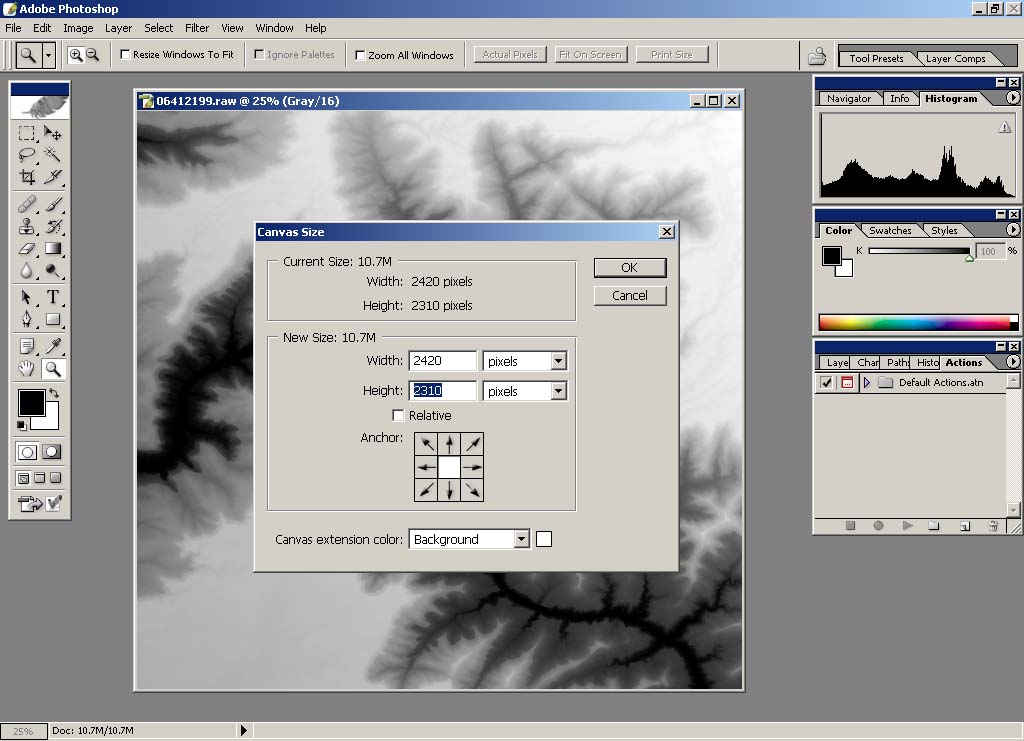
Go to Image > Canvas Size... Set the units to pixels. Copy the smaller value (width or height), and paste it into the other, so both values are the same. This will crop your terrain slightly, making it a perfect square. Save the resulting image as a TIFF (no compression, IBM byte-order).

Now for the easy part! Start by running BF2HMT. Select the map you created earlier, and open the .tiff image you just saved from Photoshop. You can see how the terrain data will be divided up in the main window. When you're ready, click "Export to map...". A dialog box will confirm that you know what you're doing. Click yes, and wait for it to finish. Congratulations! You just imported real-world terrain data into your BF2 map.
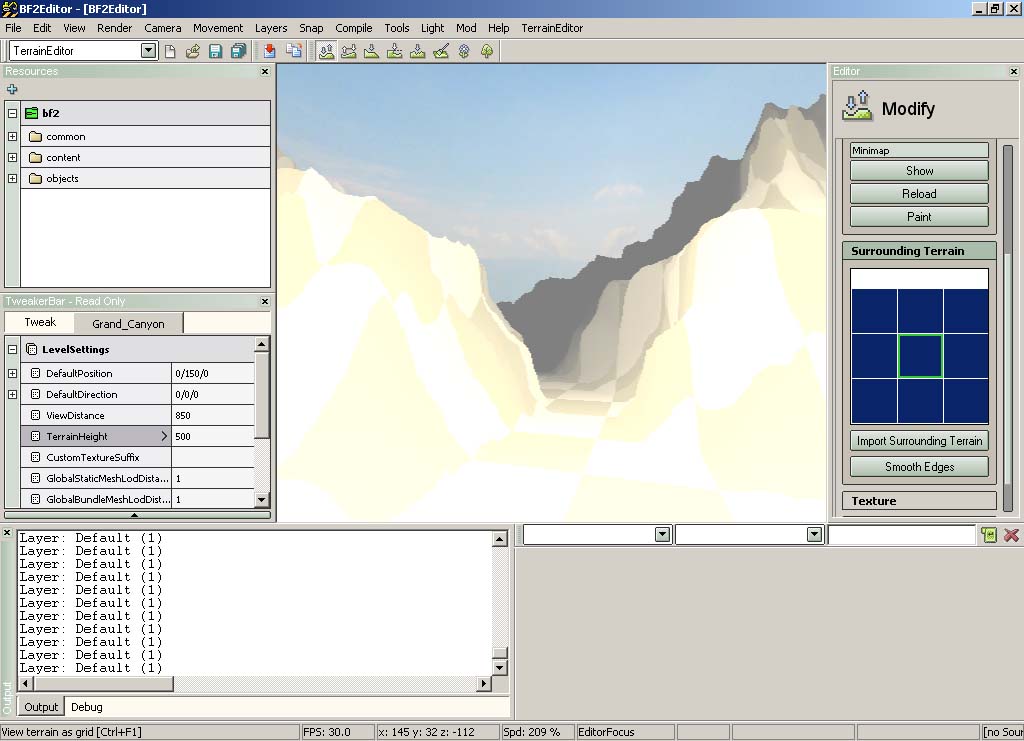
Let's go check it out in the editor. Run BF2Editor and put it in TerrainEditor mode. Open the map you created earlier. Click Render > Surrounding Terrain > Toggle Draw All. On the right-hand menu, under "Surrounding Terrain", right-click on each square, and click "Create Patch". You should now be able to see both the Primary map, and surrounding Secondary maps.
You'll probably also want to adjust the TerrainHeight value (in the "Tweaker Bar", under "LevelSettings"). By default, it's set to 163.84, which is probably too low. From experience, values near 400 work well.
Remember to "Save All" when you're done.